ZeldaMonth keeps chugging along today with the second Sweet Train car in line, the Cake Passenger Car!
![]()
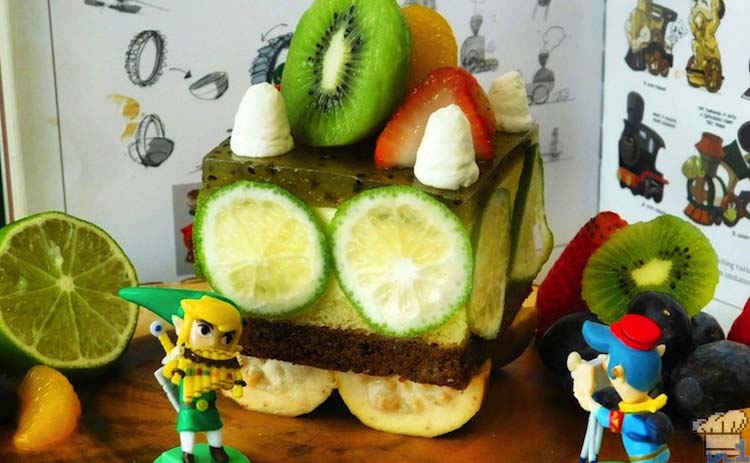
I’ll admit this car was pretty daunting to conceptualize, but also one I was really excited to try. The fruits were fairly easy to identify, but determining what each layer could be made out of definitely took a little time to work out. In the end I decided to build it like an ‘Entremet’ cake.
An entremet is a small cake made from many different components, textures, and flavors. You may have seen these elaborate little guys in the case of your local bakery or pastry shop usually precut into individual portions with a fancy garnish. Additionally, most entremets contain a layer of stabilized mousse similar to the bavarian cream we made for Angelo’s Cake from Bravely Second: End Layer.
Here comes the brainstorm.
For the bottommost layer of the cake, I knew I needed something dark, but not quite chocolate. I also needed something that had a decent amount of stability as it would be supporting the rest of the entremet above it. I landed on gingerbread as the most suitable component here and made a whole bunch in case I needed any for the other train cars (definitely not because I wanted to snack on them all week >.>.) The second layer up would have to be some kind of cake. I decided on an almond geniose because of its tight crumb and complimentary flavor with the tropical fruits.
The large white component above the geniose would become our mousse layer. In keeping with the tropical flavor profile, it wasn’t a stretch to go with a coconut bavarian cream here. Not only is it stable enough to support the fruit on top of it, but the lime “windows” could easily be affixed to the outside; a win win! Finally the green top layer could have gone a number of ways, but because the kiwi slice on top of the cake was so prominent, I thought I should incorporate it into the entremet itself as well. To that end, A shiny kiwi glaze would be my solution. With all of my layers determined, it was time to start building!
We’ll start off with a suitably firm gingerbread base.
+ Gingerbread +
ITEMS
| Ingredient | Amount | |
|---|---|---|
| Vegetable Shortening | 1 cup | 180 g |
| Sugar | 2/3 cup | 133 g |
| Molasses | 2/3 cup | 200 g |
| AP Flour | 2 1/2 cup | 400 g |
| Nutmeg | 2 tsp | |
| Ground Ginger | 2 tsp | |
| Salt | 3/4 tsp | |
| Baking Soda | 2 tsp | |
| Water (cold) | 2 1/2 TBSP | 35 mL |
EQUIP
- Electric Mixer
- Small Bowl
- Rolling Pin
- Parchment Paper
- Baking Sheet Pan
- Sharp Knife & Cutting Board
WALKTHROUGH
1. Preheat your oven to 325F
2. In the bowl of an electric mixer, cream together the vegetable shortening, sugar, and molasses until fully combined and fluffy. In a separate bowl, combine all remaining ingredients except for the water.
3. Add the dry goods to the mixing bowl in three additions, alternating with the water. Make sure the ingredients are completely incorporated before adding more of the dry.
4. Once combined, remove the gingerbread batter and place it between two sheets of parchment paper. Use a rolling pin to roll out the dough into roughly a 11″x14″ rectangle about 3/8″ thick and bake for 25 minutes.
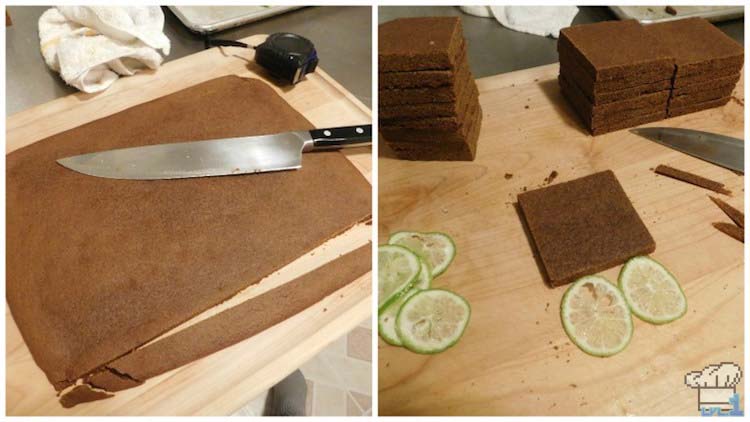
5. Once out of the oven, cool the gingerbread until it can be handled comfortably, but is still slightly soft. This will make it easier to trim the edges and prevent the gingerbread from shattering. The base of the cake car is 3″x3″ so you should be able to cut 12 squares of that size from the sheet . Wrap the extra gingerbread and place it in the freezer to use (or eat!) later.
Next comes the cake!
+ Almond Genoise Cake +
ITEMS
| Ingredient | Amount |
|---|---|
| Sugar | 117 g |
| Almond Paste | 100 g |
| AP Flour | 16 g |
| Butter (room temp) | 100 g |
| Vanilla | 4 g |
| Eggs | 3 each |
| AP Flour | 46 g |
| Baking Powder | 3/4 tsp |
| Salt | 1/2 tsp |
EQUIP
- Food Processor
- Rubber Spatula
- 9″x9″ Cake Pan
- Parchment Paper
- Pan Spray
WALKTHROUGH
1. Preheat your oven to 350F
2. Break up the almond paste and place it in the bowl of a food processor(1). Add the sugar and first quantity of flour and process until the mixture looks sandy (2).
3. Add the vanilla and softened pieces of butter to the bowl while the machine is running. The mixture should look smooth and fluffy by now (3). Add the eggs one at a time while mixing, making sure each egg is completely incorporated before adding the next. Use a rubber spatula to scrape down the sides of the bowl to make sure the batter is without lumps (4).
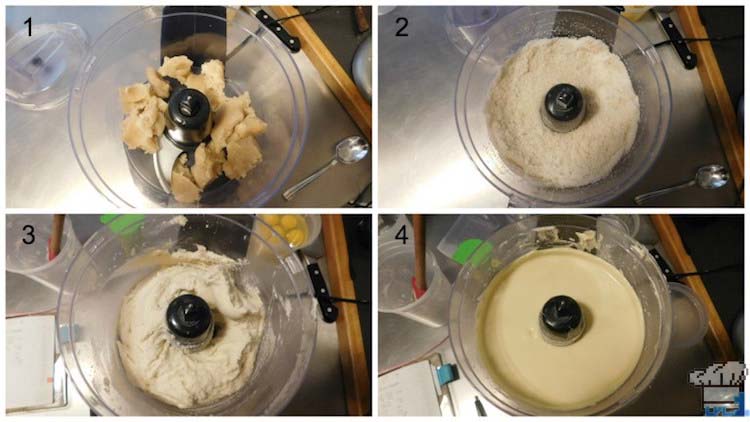
4. Add the remaining dry ingredients to the food processor and mix until completely homogeneous. Line a 9″x9″ cake pan with pan spray and parchment paper and pour the batter inside. Smooth out the top with a spatula and bake for 35 min, or until it begins to pull away from the sides.
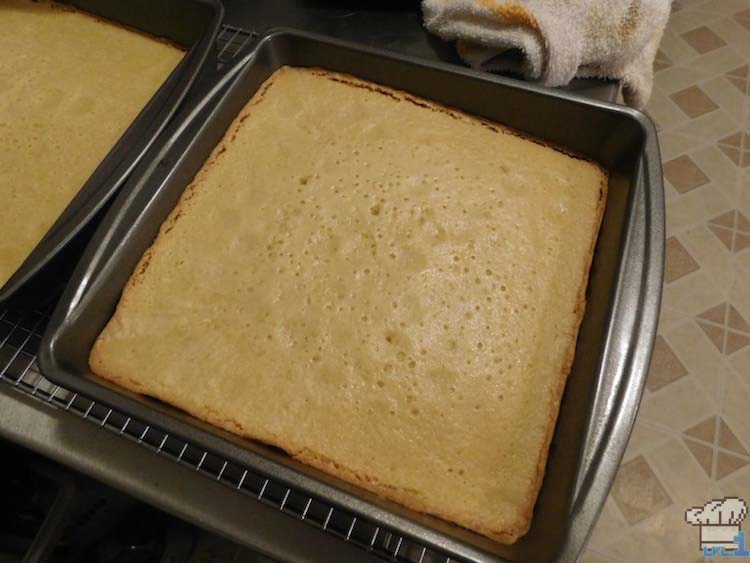
Skip down to the ‘Assembly’ section to see how to trim the genoise and get it ready for the coconut bavarian cream!
Look for coconut cream in the hispanic food section of your grocery store.
+ Coconut Bavarian Cream +
ITEMS
| Ingredient | Amount |
|---|---|
| Heavy Cream | 320 g |
| Coconut Cream | 283 g |
| Powdered Gelatin | 15 g |
| Water (cold) | 5 TBSP |
| Egg Yolks | 5 each |
| Milk | 300 g |
EQUIP
- Electric Stand Mixer, or Whisk
- Large Mixing Bowl
- Small Sauce Pot
- Rubber Spatula
- Ladle
WALKTHROUGH
Since we went over the procedure of making a bavarian cream a few recipes ago, I’m going to do an extremely abridged version here for review. The original recipe can be found on the page for Angelo’s Cake from Bravely Second: End Layer!
1. Mix the powdered gelatin with the cold water and set aside to bloom. Whip the heavy cream with the cream of coconut until soft peaks and store in the refrigerator until needed.
2. Heat the milk in a small sauce pot until it begins to steam. In a separate bowl, whip up the egg yolks. Slowly add the hot milk to the eggs with a ladle and then return it all to the sauce pot. Use a rubber spatula to continuously stir the pot while the egg milk mixture is heating up. Once it begins to thicken, remove it from the heat and use a whisk to break up any lumps that may have formed.
3. Stir in the bloomed gelatin. Make sure that the gelatin has completed melted into the egg and milk mixture, and then set it aside to cool and thicken up. Keep an eye on the mixture, and once it begins to tighten up, add the whipped cream you had made earlier and fold it in with a rubber spatula.
+ Kiwi Glaze +
ITEMS
| Ingredient | Amount | |
|---|---|---|
| Kiwi | 5 medium sized fruit | |
| Lime Juice | 1/2 tsp | |
| Water | 4 TBSP | |
| Sugar | 1 TBSP | |
| —– | —– | |
| Gelatin | 4 tsp | 11 g |
| Water (cold) | 4 TBSP | 55 g |
| Sugar | 3/4 cup | 136 g |
| Water | 6 TBSP | 90 g |
| Corn Syrup | 2 TBSP | 45 g |
EQUIP
- Sharp Knife & Cutting Board
- Small Sauce Pot
- Sieve or Mesh Strainer
- Medium Mixing Bowl
- Rubber Spatula
- Whisk
WALKTHROUGH
1. We’ll start by making a kiwi purée. Use a sharp knife to peel five ripe kiwis (1). Finely chop the fruit and add it, along with the lime juice and first amounts of water and sugar, to a small sauce pot (2). Cook the kiwis for five minutes over medium heat and then reduce the temperature to low for 10 more minutes.
2. Remove the softened fruit from the heat and pour it into a sieve above a mixing bowl (3). Use a rubber spatula to press the kiwi through the sieve to create the purée (4)! Feel free to discard any tough bits that wouldn’t pass through.
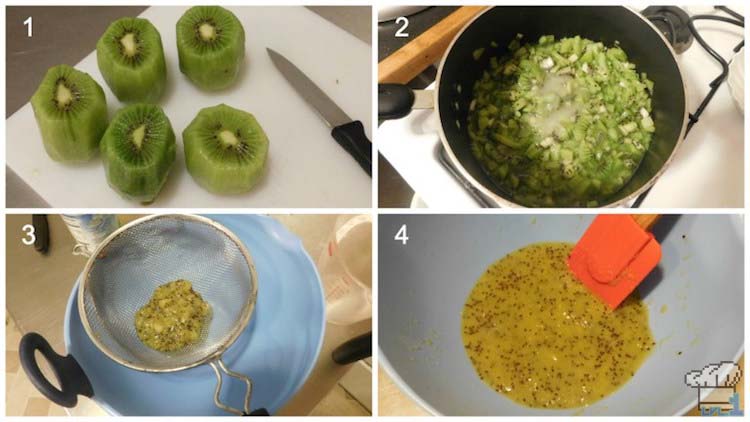
3) To make the purée into a glaze, we’ll start by blooming the gelatin in 4 TBSP of water. While that’s gelling, combine the final three ingredients in a small sauce pot and warm to dissolve over low heat. Once all of the sugar is dissolved, you can add in the kiwi purée as well as the bloomed gelatin and whisk to incorporate.
Now that we’ve gone over how to make all the different layers, we can finally start the assembly!
+ Cake Assembly +
1. Begin by removing the almond genoise cake from its pan and trim off the sticky top with a serrated knife. If you have a square of the gingerbread handy, you can use it to help level the knife and ensure an even cut all around (it also makes sure the cake is just as thick as the gingerbread layer!).
2. Line the bottom of the 9″x9″ pan with fresh parchment paper. With the top of the cake trimmed we can re-insert it cut-side facing up. Next, pour the coconut bavarian cream in to fill the pan and smooth it flat leaving just about a half inch of space to the top. Cover the pan in plastic wrap and place it in the freezer for a few hours to stiffen up.
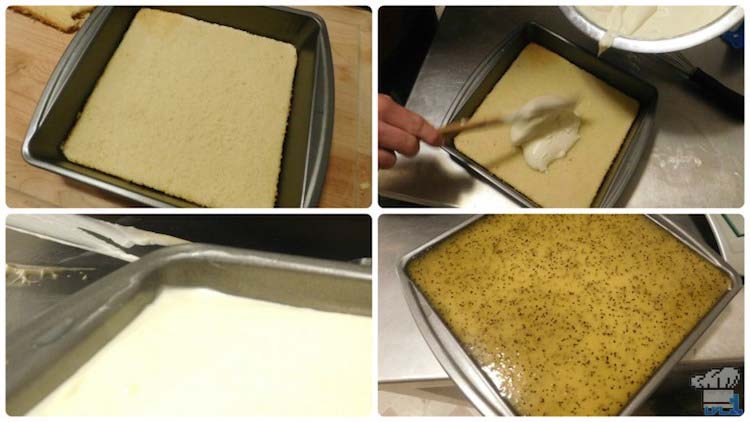
3. When the bavarian cream is solid to the touch, remove the plastic wrap and slowly pour the kiwi glaze on top (you can gently re-warm the glaze if it has become too stiff). Fill the pan all the way to the brim, and then place the whole thing back in the freezer to solidify. We’ll want it to be frozen so we can cut the cake into perfect squares.
4. Once completely frozen, use a knife or thin spatula to slide around the inside of the pan, releasing it from the sides. Turn it out upside down on to another piece of parchment paper and work quickly to trim the edges with a sharp knife (hot water will help with this.) Next, you can use the 3″x3″ gingerbread squares we made earlier as a guide for the squares of cake we”ll be cutting out.
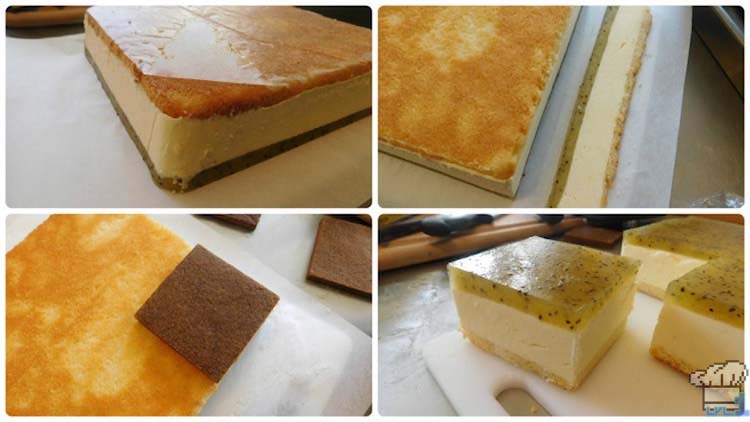
5. Invert the cake so that the genoise is on the bottom and place it on top of a gingerbread square. You can use a hot knife to carefully shape up the edges so that they are flush and the corners are defined.
+ Fruit Garnish +
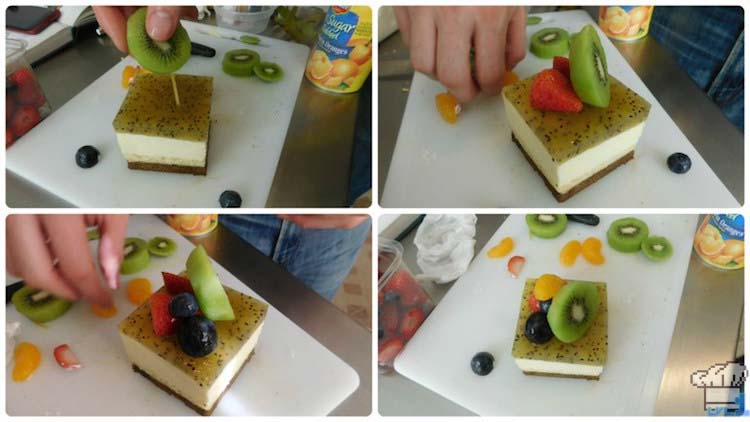
1. Now it’s time for the iconic fruit garnish that really brings the whole cake car together. I used a piece of spaghetti to act as a support for the big kiwi slice, but other than that, the fruit can stand on its own. The fruits I used were: kiwi, strawberry, concord grape, blueberry, and mandarin oranges.
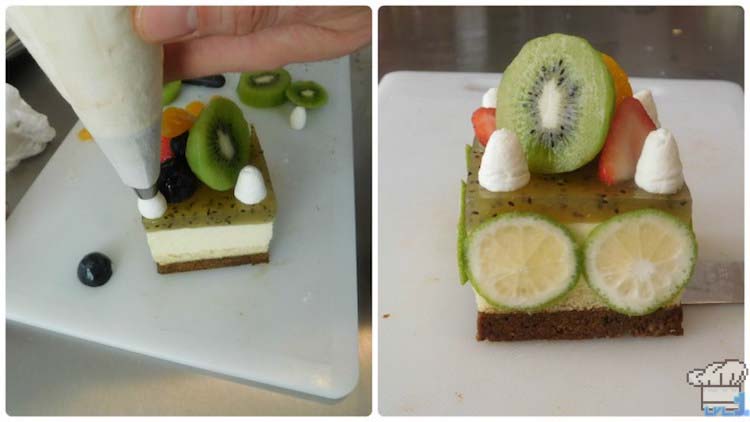
2. A few dollops of whipped cream really start to make the car look sharp. The windows on the side of the car are made of very thinly sliced lime wheels. Like I mentioned before, they stick right to the sides of the coconut mousse so you can just pop them into place! As for the wheels, the concept notes take about candied kumquats and although I would’ve loved to try that, they’re unfortunately out of season at the moment :[. I picked up some tiny guavas as a substitute.
I know it was a long journey (probably, no definitely, WAY too long) but there you have it! A sweet passenger car that any train enthusiast would drool over :D.
Hey! Thanks for reading all the the way to the end (another long one .___.’) You’re awesome :D! If you haven’t already and are looking for more nerdy food stuff, consider following me on Twitter, Facebook, tumblr and Instagram. I post a lot of work in progress pictures for the blog as well as some stuff from my real job as a pastry chef. If that sounds like something you’d be into, please check out those links above! Anyway, take care everyone and I’ll see you soon with an all new recipe!

This is amazing! I love that you posted the recipes, and the how-to pictures are awesome. Makes me want to start playing video games!