I know I kind of fell off the wagon these past few weeks, but I’m not here to give excuses; I’m here to give RESULTS!
If you look for it, you can find the Hylian language throughout many of the Legend of Zelda games: on signs, gravestones, and sometimes even bottles. What you may not have been aware of however, is that, more often than not, the symbols are merely a cipher for Japanese or English writing systems and can therefore be easily translated! One curious example of this writing can be found inside the cafe on Windfall Island in The Wind Waker.
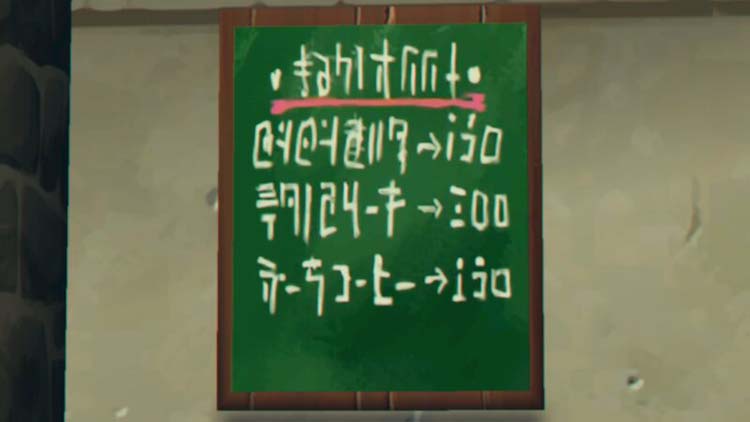
Translation:
TODAY’S RECOMMENDATIONS
Lon Lon Milk -> 150
Deku Nut Cake -> 300
Zora Coffee -> 250
And so, dear readers, I have endeavored to create this Deku Nut Cake without any actual in game iteration or description. This is probably as far removed from canonical game food as I’m willing to get so let’s get to it for my final Zelda Month recipe!
Wait, it’s December what now!?
What is a Deku Nut?
Much like how my local grocery store doesn’t import from Ordon Farm, Deku Nuts aren’t something I find on the shelves either. Fortunately, however, this time of year is famous for “chestnuts roasting on an open fire” and it just so happens that they make a great substitute! We won’t be doing any open flame cooking in the recipe but you should be able to find chestnuts relatively easily in your local grocery store.
So grab a pound or so, click ‘Continue Reading,’ and follow along!
+ Roasted Chestnuts +
ITEMS
| Ingredient | Amount |
|---|---|
| Chestnuts | ~ 1 lb |
| Water | as needed |
| Salt | 1 tsp |
EQUIP
- Serrated Knife
- Cutting Board
- Small Sauce Pot
- Colander
- Roasting Pan
- Heat Proof Bowl
- Food Processor
WALKTHROUGH
- You’ll notice that most of the chestnuts will have a flat side, and a more rounded side. Place the chestnut flat side down, and hold securely between your fingers (always be careful when using knives! Click here for a quick ‘how to’ on holding/wielding them). Take the serrated knife and, using a soft sawing motion, cut horizontally across the rounded side of the chestnut making an incision deep enough to pierce the hard shell coat (seen in fig 2.) It may help to position the nut close to the edge of your cutting board so you can get a slightly better angle to cut.
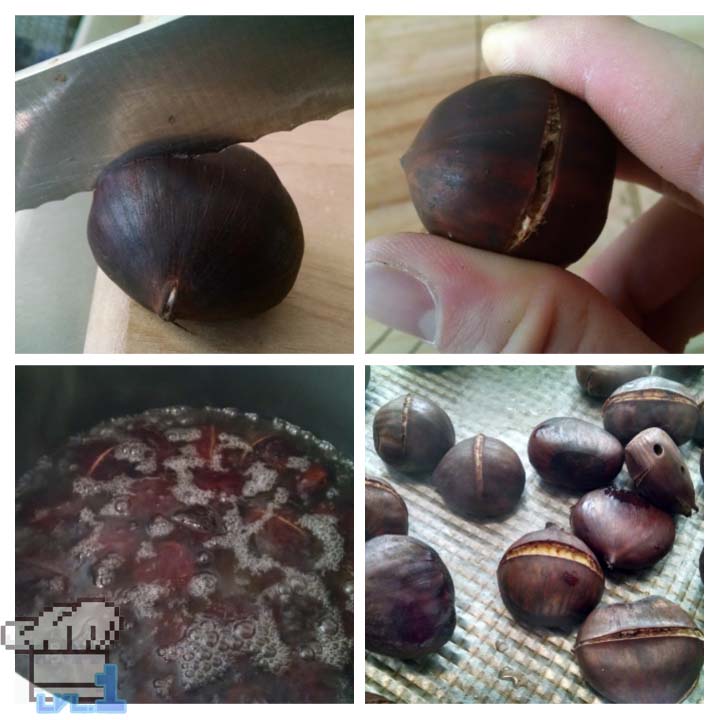
- Once all of your chestnuts are sliced, throw them into a pot and add enough water to just cover them. Add the salt and bring the pot to a boil. While the water is heating up, preheat your oven to 425F.
- As soon as the water begins to boil, remove the pot from the heat and pour through a colander to drain the nuts (the water is very hot, so be careful not to burn yourself!).
- Place the chestnuts on a roasting pan and bake them in the oven for 15 minutes
- After 15 min, remove them from the oven and place them in a heat proof bowl, covered with a towel in order to allow them to cool slightly. At this point they should be looking very much like the Deku Nuts from the game!
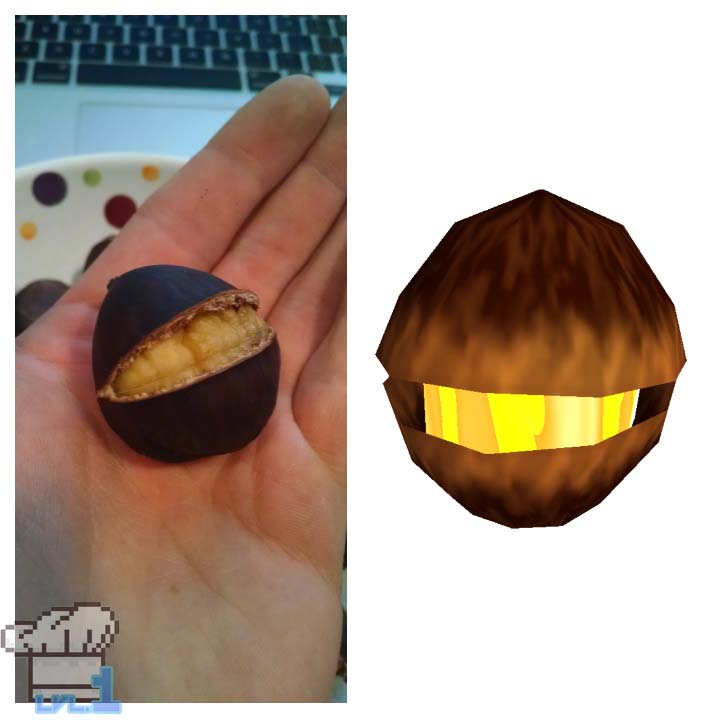
- Once the chestnuts are cool enough for you to handle, it’s time to peel them.. by hand… This can get frustrating if you get some rather tenacious shells, but then again some will pop right out without a fight. If you notice any particularly dark spots once they are peeled, use a small sharp knife to remove those areas (they don’t taste very good…blegh!).
- After you have successfully peeled all of your chestnuts, give yourself a pat on the back; you did well and I’m proud of you 🙂
- Pulse the peeled chestnuts in a food processor until no pieces bigger than a pea remain; set them aside (alternatively, you could use a sharp chef knife to chop them all up by hand if you do so desire).
+ Milk Caramel +
Before we get into the cake baking proper, we will be making a quick caramel sauce that will be folded into the batter. :9
ITEMS
| Ingredient | Amount |
|---|---|
| Sugar | 1/2 cup |
| Heavy Cream | 1/2 cup |
| Coconut Milk | 3/4 cup |
| Lemon Juice | 1 TBSP |
| Salt | heavy pinch (1/8 tsp) |
EQUIP
- Small Sauce Pot
- Whisk
- Heat Proof Measuring Cup
- Heat Proof Spatula
WALKTHROUGH
- Place the 1/2 cup of sugar in a clean and dry small sauce pot over medium heat, while stirring constantly with a heat proof spatula. The sugar will form some lumps along the way, but just keep stirring and they will eventually melt away until you are left with liquid sugar (as seen in panel 3 below).
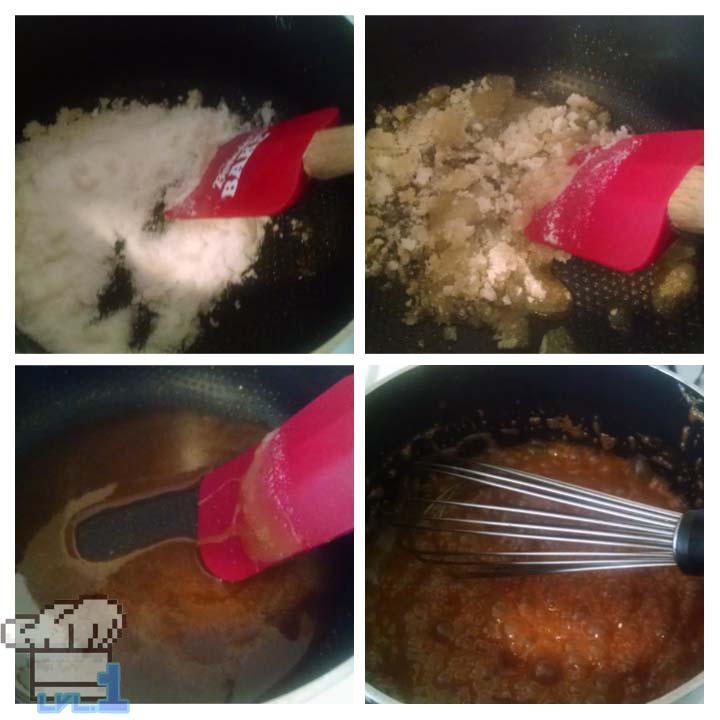
- Once you have a deeply colored liquid sugar in your pot, switch to a whisk and pour in the ½ cup of heavy cream while stirring. The cream will boil up violently at first so keep whisking until it settles back down. If any new lumps of sugar have formed at this point, increase the heat and stir until they have dissolved.
- Remove from the heat. Add to the pot the 3/4 cup coconut milk, lemon juice, and healthy pinch of salt and stir to combine (you can add more or less salt depending on your personal preference).
- Once the sauce has cooled, pour it into a heat proof measuring cup and split it into two 3/4 cup portions, which we will be saving for later
Now it’s time to put it all together!
+ Chestnut Bundt Cake +
ITEMS
| Ingredient | Amount |
|---|---|
| Butter (softened)*** | 2 1/2 sticks (12 oz) |
| Sugar | 2 cups |
| Eggs | 4 each |
| Vanilla | 1 tsp |
| AP Flour | 3 cups |
| Baking Powder | 1 tsp |
| Salt | 1 tsp |
| Baking Soda | 1/2 tsp |
| Milk Caramel (see recipe above) | 3/4 cup |
| Bartlett Pears | 2 each (~1 1/2 cups) |
| Chestnuts (see recipe above) | 1 -2 cups |
***when you unwrap the butter, don’t throw away the wrappers! We can use them to butter the bundt pan
EQUIP
- Electric Mixer
- Sharp Kitchen Knife
- Vegetable Peeler
- Melon Baller or Rounded Teaspoon
- 2 Large Mixing Bowls
- Sifter
- Rubber Spatula
- Bundt Pan
In order to give the cake a bit more flavor and character, I decided to add in a couple of Bartlett Pears to represent the Hyoi Pears from the game.
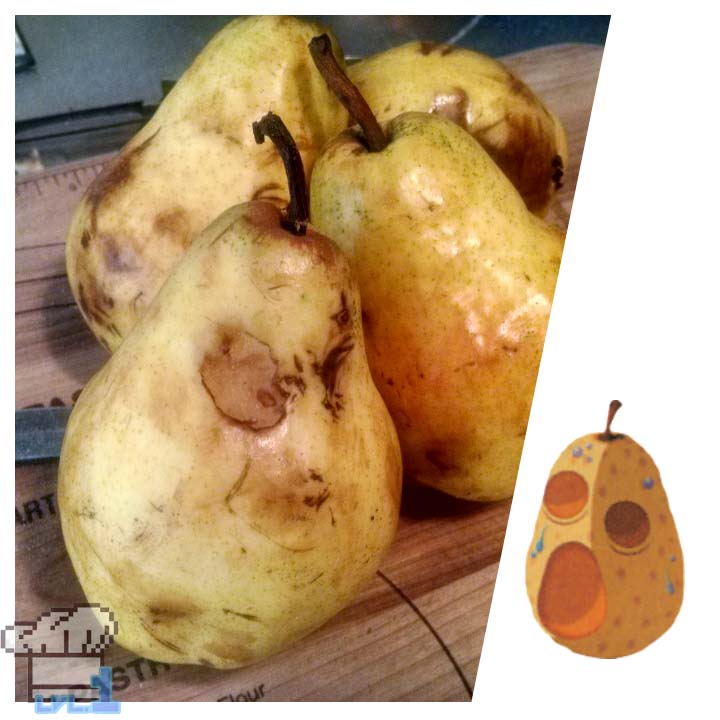
WALKTHROUGH
- Preheat the oven to 325F
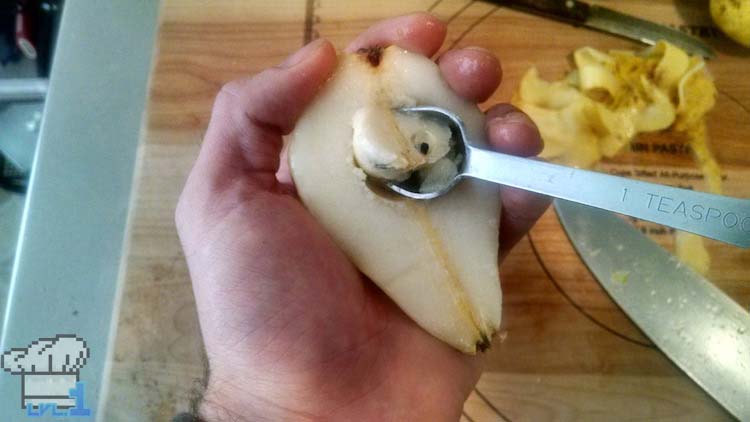
- Peel the fruit, and then use a sharp kitchen knife to cut the pear in half lengthwise (from stem to base). A melon baller, or rounded teaspoon, can be used to scoop out the seeds from the center, and you can simply remove the stem pieces with your fingers. Use your knife to chop the pears into small dice and set aside.
- Cream the butter (remember to save those wrappers!) and the sugar in the bowl of an electric mixer until light and fluffy.
- Add the eggs, one at a time, scraping down the bowl after each addition. Add in the vanilla with the final egg.
- Combine the AP Flour, baking powder, salt, and baking soda together and sift into a large mixing bowl. Also combine the 3/4 cup caramel sauce with the 1 1/2 cups of chopped pear in a separate bowl. I will be referring to these as the “dry goods” and “wet goods,” respectively, in the next step.
- Always turn off the mixer before adding to the bowl. Start by adding 1/3 of the dry goods, and mix on low speed to combine. Next add 1/2 of the wet goods to the bowl, and mix on low to combine. Scrape down the sides of the bowl with a spatula when necessary. Continue alternating between dry and wet ingredients like this until you have added the last of the dry (all together the additions are: Dry, Wet, Dry, Wet, Dry).
- Finally, add the chopped chestnuts to the mixer, and incorporate on medium speed for about 10 seconds
- To prepare the bundt pan, we can use the saved butter wrappers from before.
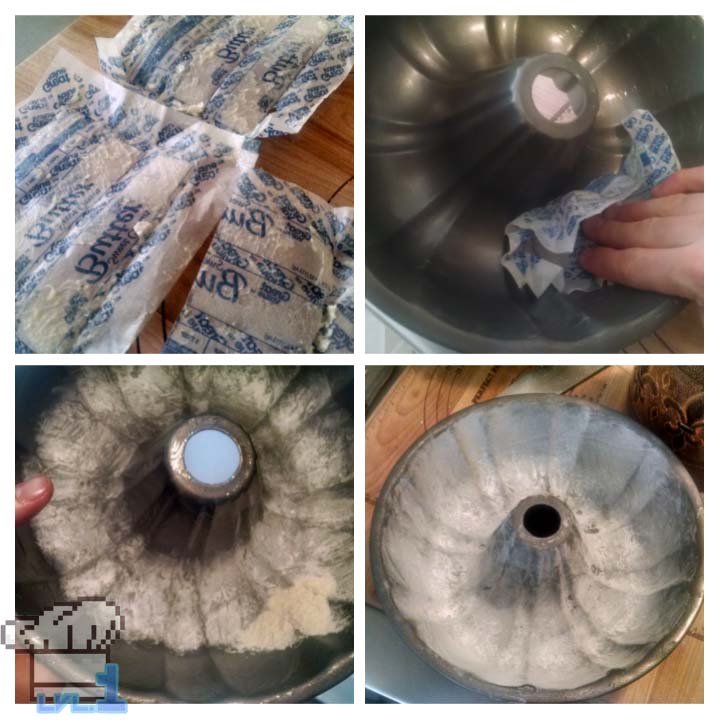
Rub the wrappers, buttery side down all along the inside of the pan (alternatively you could use pan spray, but the color won’t be as nice). Then, take a little extra AP flour and toss it into the buttered pan. Rotate it around to coat, and knock out any extra so it looks like the fourth panel above. - Use a spatula to transfer the batter into the floured bundt pan. Smooth it out and make sure there is at least 3/4″ of space between the top of the batter and top of the pan so it doesn’t overflow during baking (remove any excess batter if necessary).
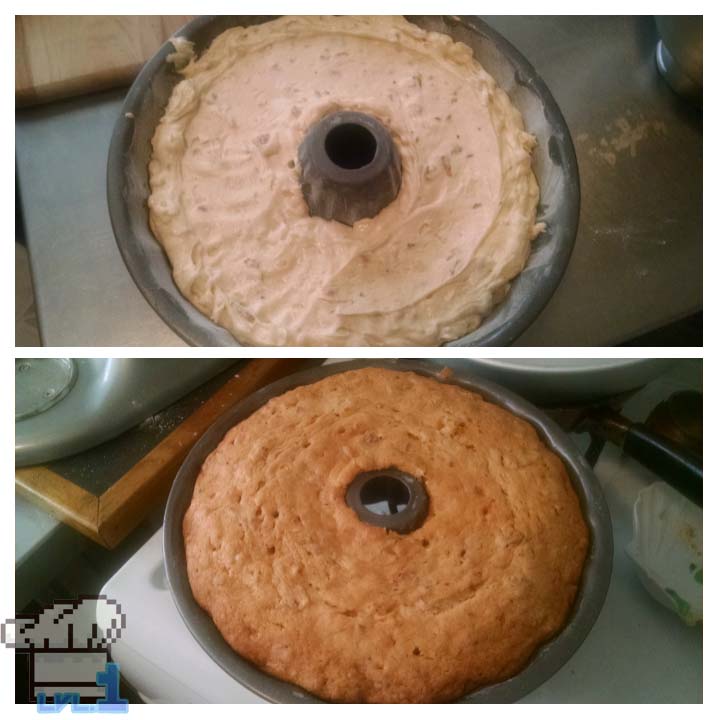
- Bake the bundt cake for 85 minutes (I know it’s long, but it’s worth it!). Test for doneness by inserting a toothpick, or small sharp knife, into the cake and it should come out clean.
- Let the cake cool for about 30 minutes before running a small sharp knife along the edges. Invert the cake onto a plate and gently tap the sides until it releases from the pan. Now I’m really proud of you 🙂
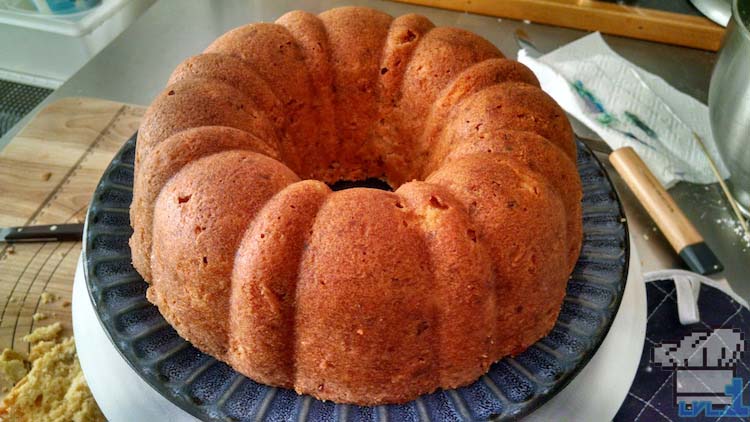
I think this cake eats quite well by itself, or with coffee (Zora, or otherwise). If you’re looking to sweeten it up a bit, however, you can take the other 3/4 cup of caramel sauce and drizzle it over the top.
I hope you have enjoyed all of these Zelda recipes, as they’ve been really fun to research and work on. Again, I apologize for my lack of content lately, but I’ve got a really good feeling about the future of Lvl. 1 Chef in 2016, so certainly stay tuned!
…and may your soufflés always rise to the occasion.
Hey! Thanks for reading all the the way to the end! You’re awesome :D! If you haven’t already and are looking for more nerdy food stuff, consider following me on Twitter, Facebook, tumblr and Instagram. I post a lot of work in progress pictures for the blog as well as some stuff from my real job as a pastry chef. If that sounds like something you’d be into, please check out those links above! Anyway, take care everyone and I’ll see you soon with an all new recipe!

